DuplicateFinder User Manual
v2.0 · Windows 10 / 11 / Server 2019+ · macOS 12+
DuplicateFinder scans any folder—or an entire drive—for duplicate files, groups them by content, and proposes a safe merge plan that moves copies into the folder that already holds the most files, then recycles the leftovers. Nothing is deleted permanently until you review and confirm.
Key capabilities:
- 4-stage detection pipeline — hard-link check → size filter → partial hash → full content hash. Eliminates ~99 % of candidates before reading the full file.
- Persistent hash cache — re-scans of large folders complete in seconds by reusing USN-verified hashes from a previous run.
- Safe deletion — duplicates are moved to the Recycle Bin (not permanently deleted), and a dry-run mode lets you preview every planned move before committing.
- Background operation — runs overnight via system tray, survives screen lock, and sends a Windows toast notification when done.
System Requirements
| Operating system | Windows 10 (1903+), Windows 11, Windows Server 2019 / 2022 / 2025 (with the Desktop Experience), or macOS 12 Monterey or later |
|---|---|
| Architecture | Windows: x64 (64-bit). macOS: universal (Intel x86_64 and Apple Silicon arm64) |
| RAM | 4 GB minimum, 8 GB recommended for drives > 500 GB |
| Disk space | ~60 MB for the application + cache folder in %APPDATA% |
| Supported drives | Internal and USB-attached drives only. Network drives and mapped network locations are not supported. |
| Internet | Required at first activation and every 7 days for token renewal |
| Permissions | Read access to the folders you want to scan; write access to move/delete duplicates |
Installation
Installing on Windows
- Download DuplicateFinderSetup.zip from the download page or your purchase confirmation email.
- Extract the ZIP and run
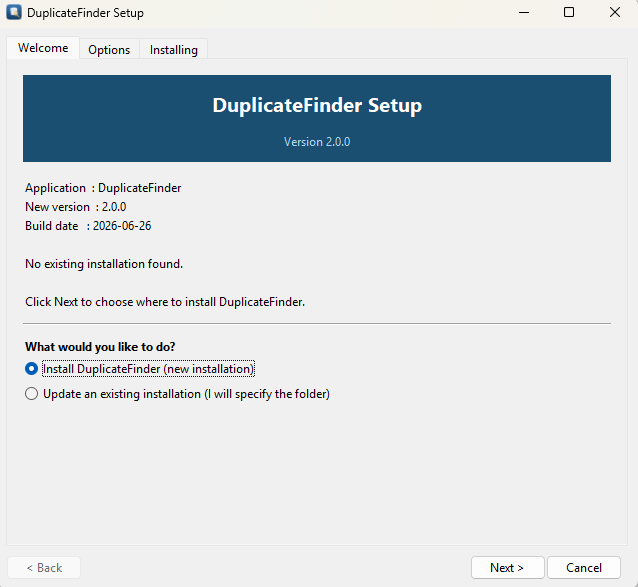
DuplicateFinderSetup.exe. - The installer opens on the Welcome tab and displays the application name, version, and build date. If no previous installation is found it selects Install DuplicateFinder (new installation) automatically. Click Next.
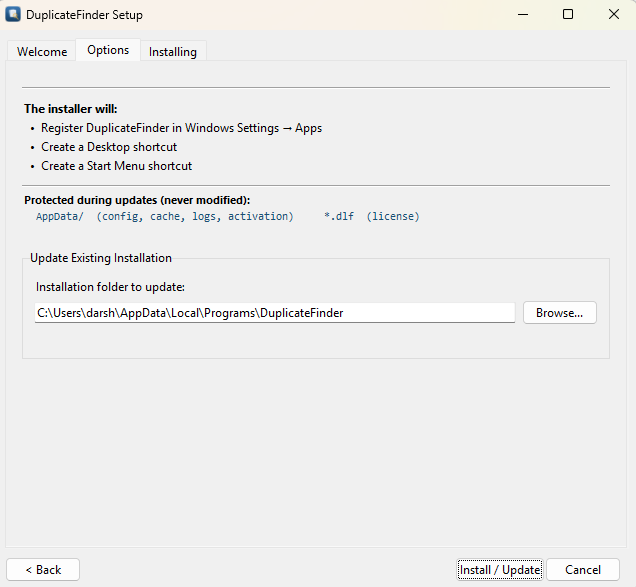
- The Options tab confirms what the installer will do: register the app in Windows Settings → Apps, create a Desktop shortcut, and create a Start Menu shortcut. Click Install / Update to proceed.
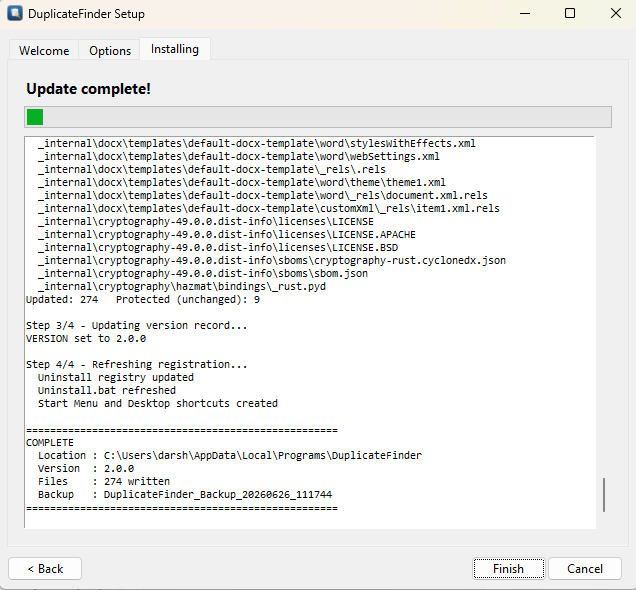
- The Installing tab shows a progress bar and a live file log. When complete it displays Update complete! along with the installation location, file count, and backup folder name. Click Finish.
Updating an existing installation
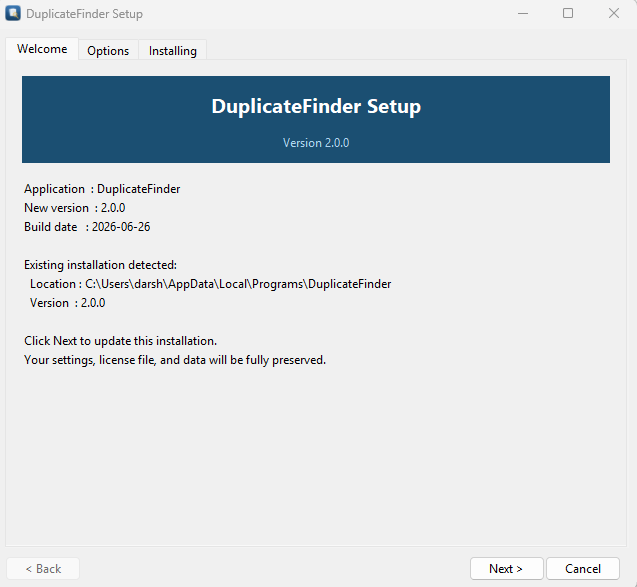
Run the new DuplicateFinderSetup.exe on a machine that already
has DuplicateFinder installed. The Welcome tab automatically detects the
existing installation, shows its location and current version, and selects
Update an existing installation. Your settings, licence file, and
cached data are never modified during an update — the previous executable is
backed up automatically before files are overwritten.
Installing on macOS
- Download DuplicateFinder.dmg (universal build) from the macOS download or your purchase confirmation email.
- Open the .dmg and drag DuplicateFinder into your Applications folder.
- On first launch, right-click the app and choose Open to approve it in Gatekeeper. The same purchase key activates either platform.
Activation
Bind your purchase key to this machine.
On first launch the Activate DuplicateFinder dialog opens automatically. It shows your Machine ID (a hardware fingerprint used to bind the licence) and a status banner indicating the app is running in trial/limited mode.
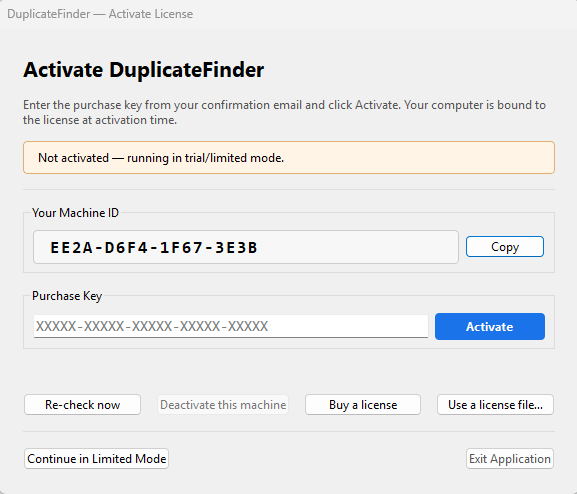
Activating your licence
- Paste your Purchase Key (format:
XXXXX-XXXXX-XXXXX-XXXXX-XXXXX) from your confirmation email into the Purchase Key field. - Click Activate. The app contacts the activation server, verifies the key, and stores a signed licence token on your machine.
- A confirmation dialog appears: "DuplicateFinder is now activated (tier: standard). Enjoy!" Click OK — the activation dialog closes and the main window opens.
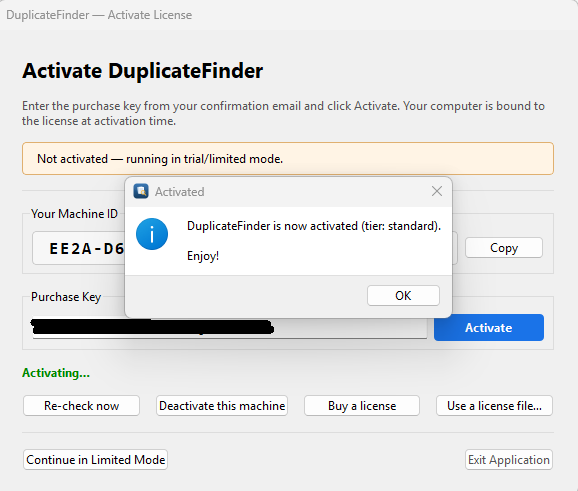
Other options on the activation dialog
- Re-check now — manually trigger a licence verification against the server (useful if activation was just processed).
- Deactivate this machine — release this machine's activation so the key can be used on another PC.
- Buy a license — opens the purchase page in your browser.
- Use a license file… — import a
.dlflicence file issued manually by support. - Continue in Limited Mode — run the app with reduced functionality without activating.
One machine per key
Each licence key activates a single machine. To move to a new PC, open Help → Deactivate this machine on the old one (or use the Deactivate this machine button in the activation dialog), then activate on the new machine with the same key. If the old machine is unavailable, contact support@azideasolutions.com to release the activation manually.
Move limit. For anti-piracy reasons, a licence can be moved between computers a maximum of 5 times. Once the limit is reached the key stays on its current machine. Contact support@azideasolutions.com if you need assistance beyond the limit.
Running DuplicateFinder on several machines at once? Buy one key per machine — you can purchase multiple keys in a single order on the Buy page.
Setup: Folders & File Types
Configure what to scan before starting.
The Setup tab is split into two panels side-by-side: Folder Selection on the left and File Type Selection on the right.
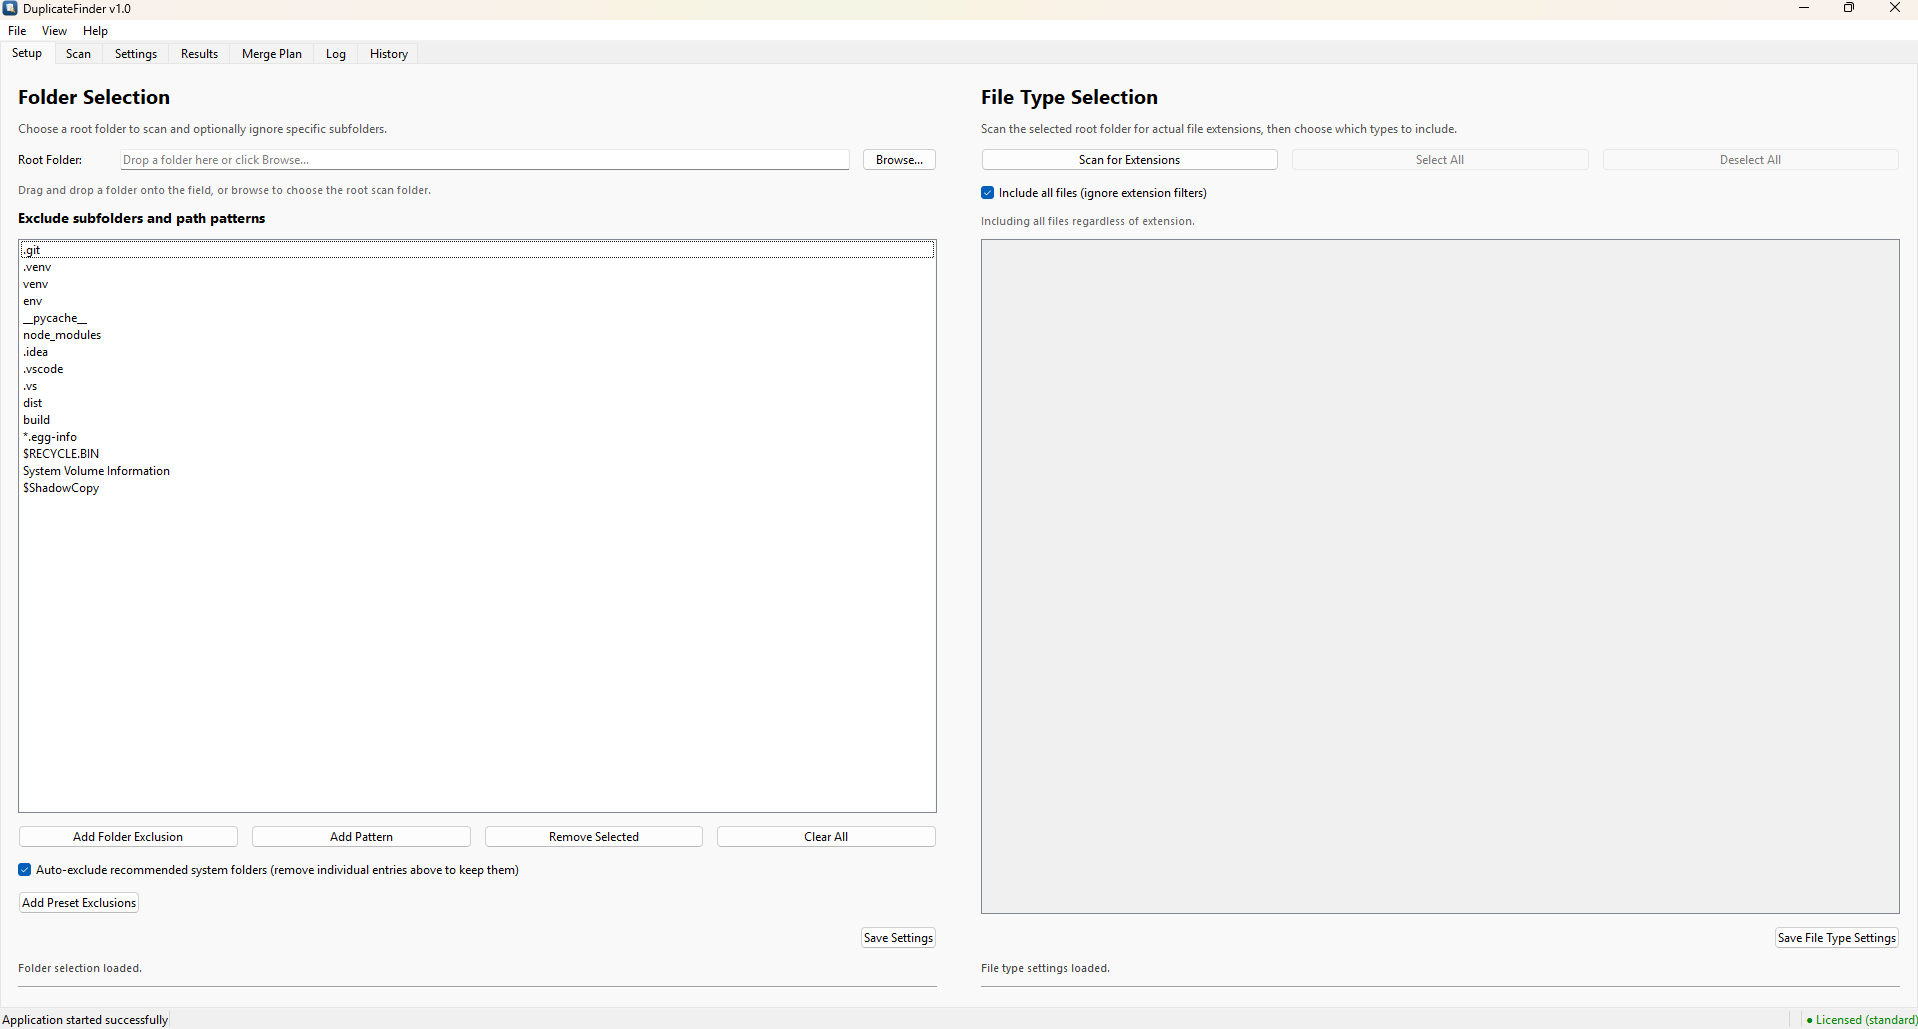
Selecting a root folder
- Type a path directly into the Root Folder field, drag a folder onto it, or click Browse… to pick one.
- The root folder is the top-level directory the scan will walk recursively.
- Click Save Settings to persist the selection for future sessions.
Excluding subfolders and path patterns
The exclusion list in the left panel lets you skip folders or file-name
patterns anywhere under the root folder. Several system and development
directories are pre-populated by default (e.g. .git,
node_modules, $RECYCLE.BIN,
System Volume Information).
- Add Folder Exclusion — browse to a specific subfolder to skip.
- Add Pattern — type a name or wildcard (e.g.
*.egg-info) that is matched anywhere in the path. - Remove Selected — delete the highlighted exclusion entries.
- Clear All — remove all exclusions at once.
- Auto-exclude recommended system folders — when checked, common system directories are excluded automatically even if removed from the list above.
- Add Preset Exclusions — restores the default set of recommended exclusions in one click.
File-type filters
The File Type Selection panel on the right lets you limit the scan to specific extensions. Click Scan for Extensions after setting a root folder — DuplicateFinder scans the folder and groups every extension it finds into categories (Images, Documents, Archives, Code, Other) with file counts shown next to each.
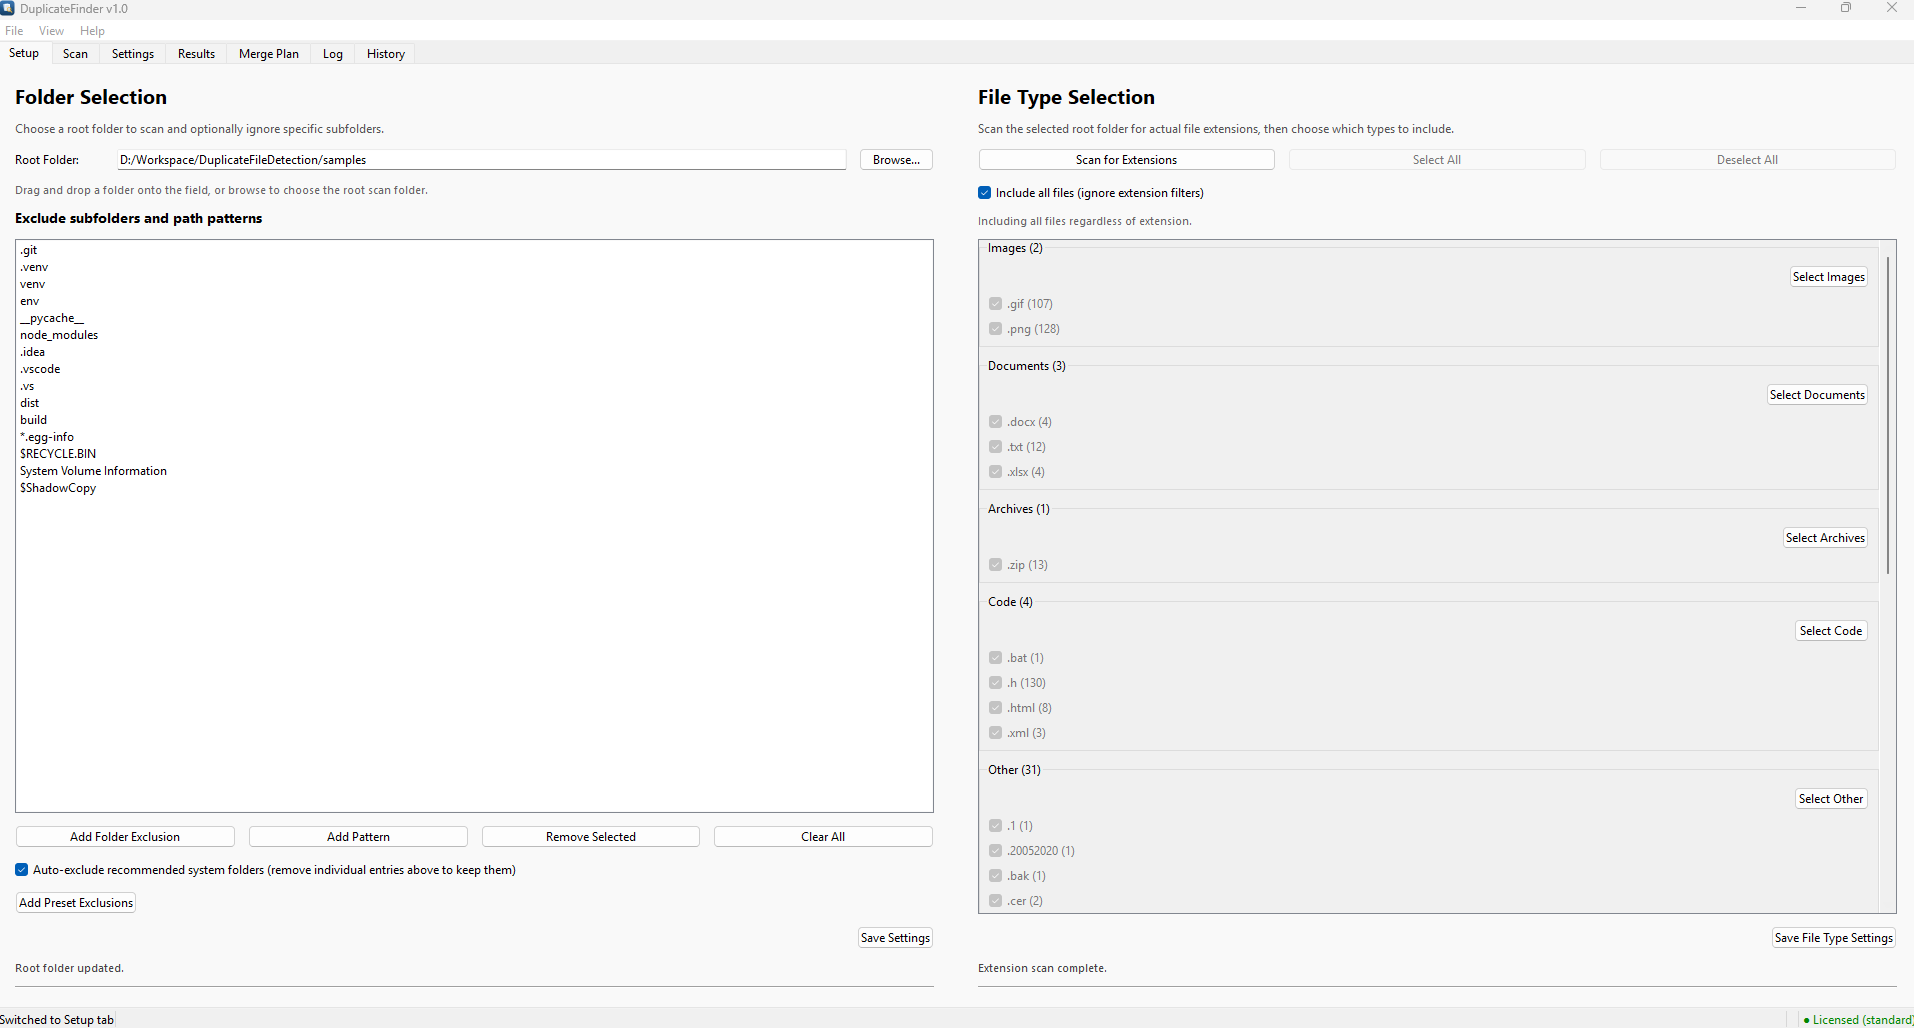
- Tick individual extensions or click Select [Category] to select a whole group at once.
- Use Select All / Deselect All to toggle everything.
- Check Include all files (ignore extension filters) to scan every file regardless of extension — this is the default before extensions have been scanned.
- Click Save File Type Settings to persist your selection.
Scanning
How the 4-stage pipeline works.
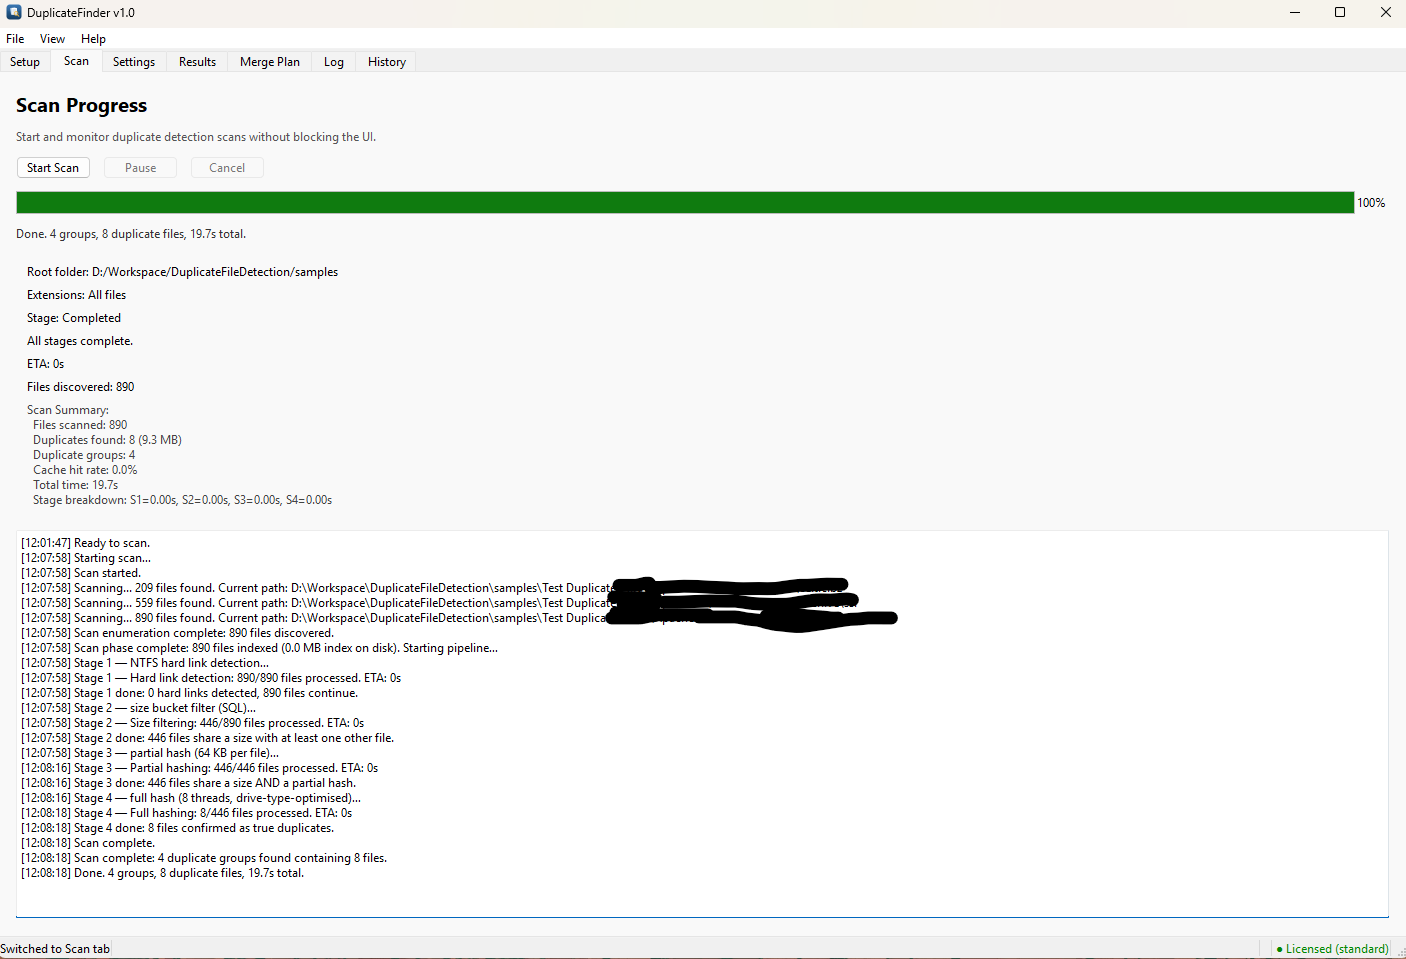
Starting a scan
Switch to the Scan tab and click Start Scan. The scan runs on a background thread so the UI remains responsive throughout. The status line above the progress bar updates in real time, and a timestamped log below the summary shows each stage as it runs.
The 4-stage pipeline
- Stage 1 — Hard-link detection — files that share the same NTFS inode are grouped immediately without hashing.
- Stage 2 — Size bucket filter — files with a unique size cannot have a duplicate and are removed from consideration instantly.
- Stage 3 — Partial hash (64 KB per file) — only the first 64 KB of each remaining candidate is hashed. Files that differ in this prefix are eliminated before full hashing.
- Stage 4 — Full hash — the remaining candidates are fully hashed using the configured algorithm (MD5 by default; SHA-256 configurable in Settings). Files with identical full hashes are confirmed duplicates.
When the scan finishes, the status line shows a summary such as "Done. 4 groups, 8 duplicate files, 19.7s total." The panel also reports files discovered, cache hit rate, total time, and a per-stage time breakdown (S1/S2/S3/S4).
Pause and Cancel
- Pause — suspends I/O immediately; resume at any time.
- Cancel — stops the scan and discards partial results.
Settings
Tune performance and behaviour.
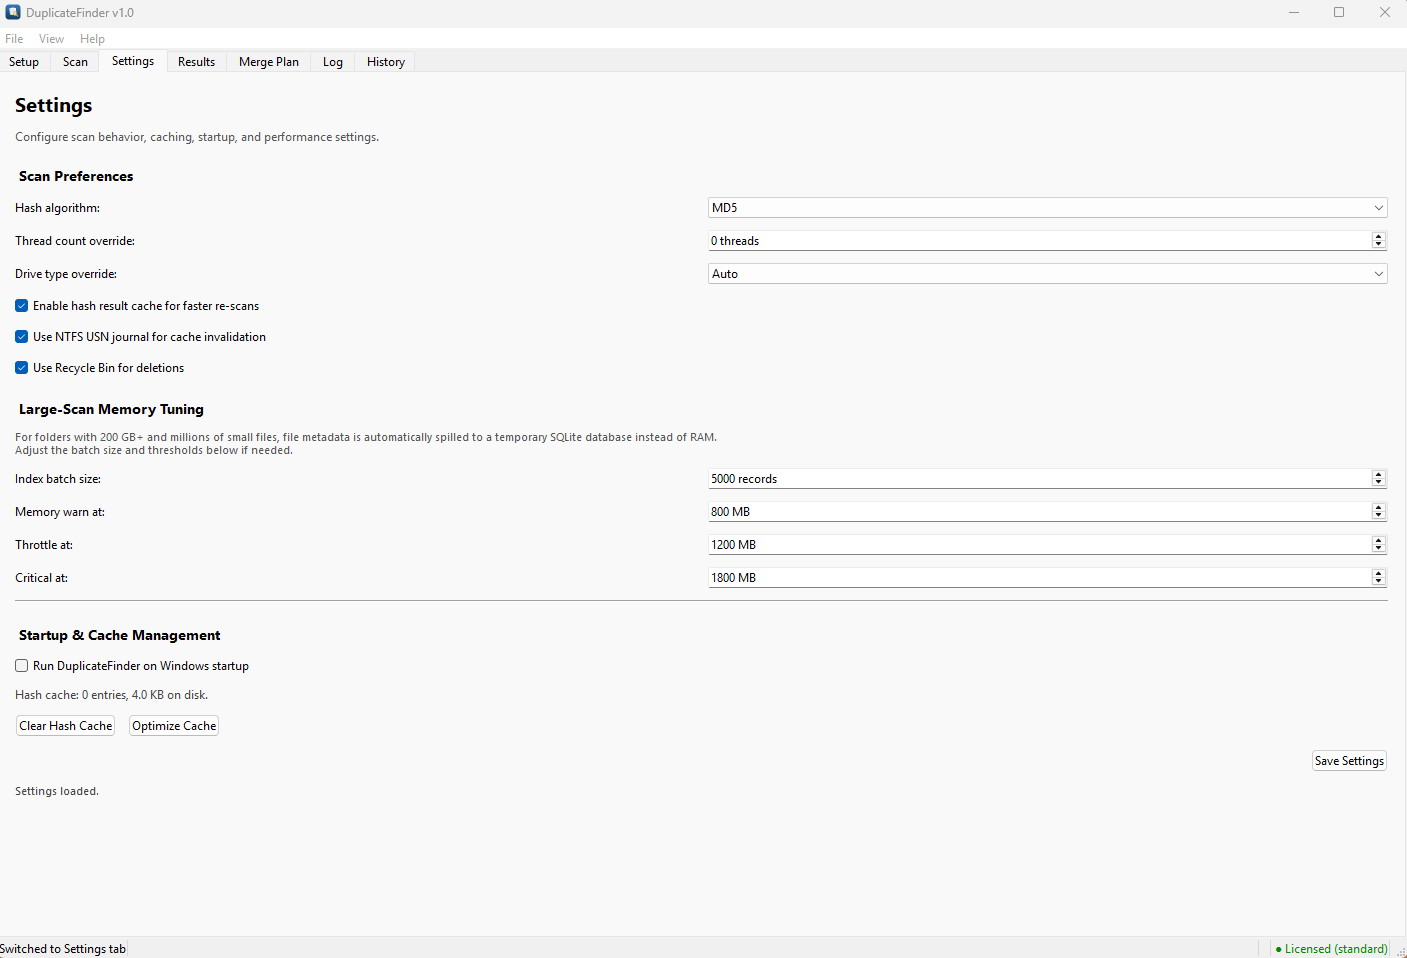
Scan Preferences
| Setting | Description |
|---|---|
| Hash algorithm | MD5 (default, fast) or SHA-256 (slower but collision-resistant). MD5 is fine for most duplicate-finding tasks. |
| Thread count override | Number of parallel hasher threads. 0 means use the number of logical CPU cores automatically. Lower this if you need the machine to remain responsive during a scan. |
| Drive type override | Auto (default) detects whether the drive is HDD or SSD and adjusts I/O strategy accordingly. Override only if detection is incorrect. |
| Enable hash result cache for faster re-scans | Stores computed hashes in a local SQLite database so unchanged files do not need to be re-hashed on subsequent scans. |
| Use NTFS USN journal for cache invalidation | Uses the Windows USN change journal to detect which files have changed since the last scan, ensuring the cache is never stale. |
| Use Recycle Bin for deletions | When checked (default), duplicate files are sent to the Recycle Bin rather than permanently deleted. Uncheck only if you are certain you do not need to recover files. |
Large-Scan Memory Tuning
For folders with 200 GB+ or millions of small files, DuplicateFinder automatically spills file metadata to a temporary SQLite database instead of holding everything in RAM. Adjust these thresholds if needed:
| Setting | Description |
|---|---|
| Index batch size | Number of file records processed in each batch (default: 5 000). Increase for faster indexing on machines with ample RAM. |
| Memory warn at | RAM usage level (default: 800 MB) at which a warning is logged. |
| Throttle at | RAM usage level (default: 1 200 MB) at which the scan slows down to reduce memory pressure. |
| Critical at | RAM usage level (default: 1 800 MB) at which the scan pauses and waits for memory to be freed before continuing. |
Startup & Cache Management
- Run DuplicateFinder on Windows startup — registers the app with Windows Task Scheduler so it launches automatically at logon.
- Hash cache info — shows the number of cached entries and the size on disk.
- Clear Hash Cache — deletes all cached hashes. The next scan will re-hash every file from scratch.
- Optimize Cache — runs SQLite VACUUM to compact the cache database and reclaim disk space.
Click Save Settings to apply any changes.
Reviewing Results
Inspect every duplicate group before acting.
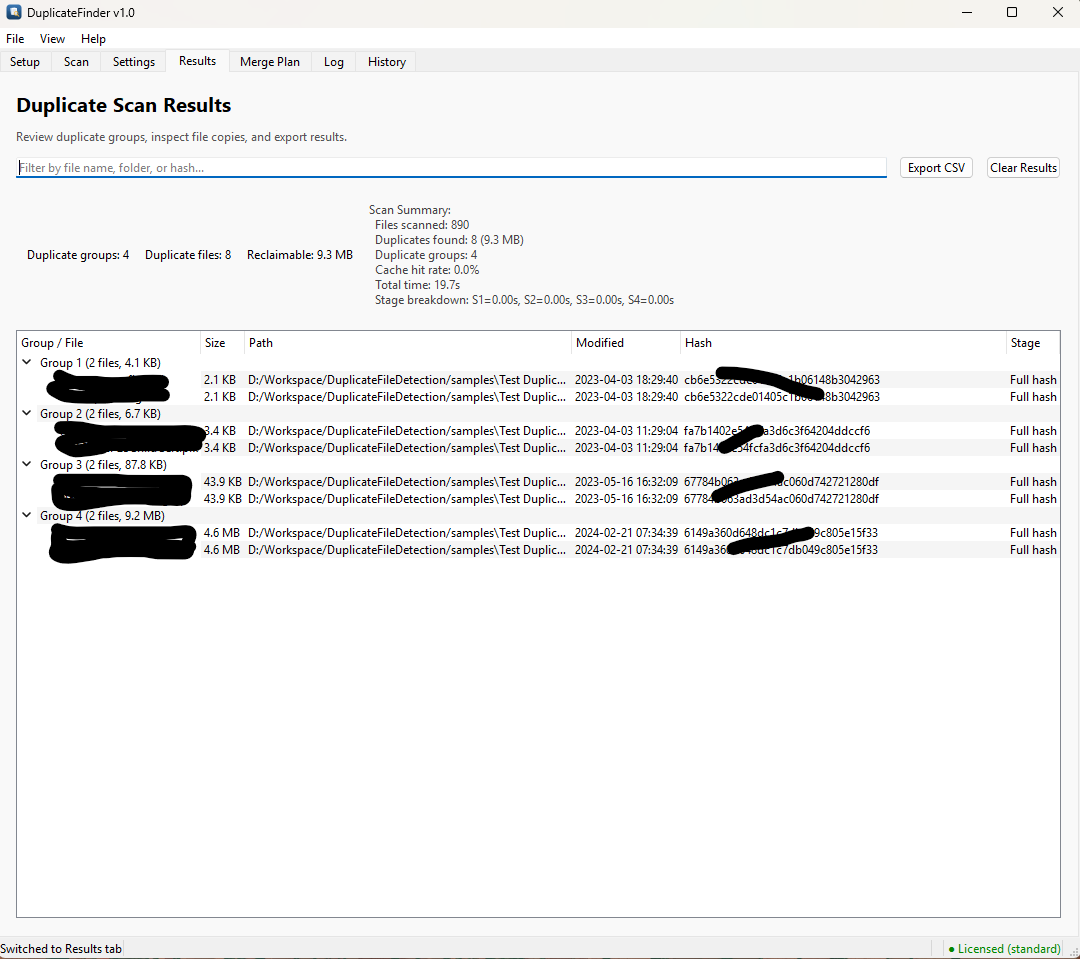
Summary strip
The bar at the top of the results list shows Duplicate groups, Duplicate files, and Reclaimable space at a glance, alongside the full scan summary (files scanned, cache hit rate, total time, and per-stage breakdown).
Understanding the tree
Each top-level row is a duplicate group — a set of files whose full content is identical. Expand a group to see each copy with its full path, size, last-modified date, content hash, and the pipeline stage at which it was confirmed (e.g. Full hash).
Filtering and exporting
- Use the Filter bar to search by file name, folder path, or hash value — the tree updates live as you type.
- Click Export CSV to save the full results to a spreadsheet for external review or record-keeping.
- Click Clear Results to discard the current results and return to a clean state.
Documents,
cloud-sync folders) before executing the merge plan.
The Merge Plan
Safe, reversible consolidation.
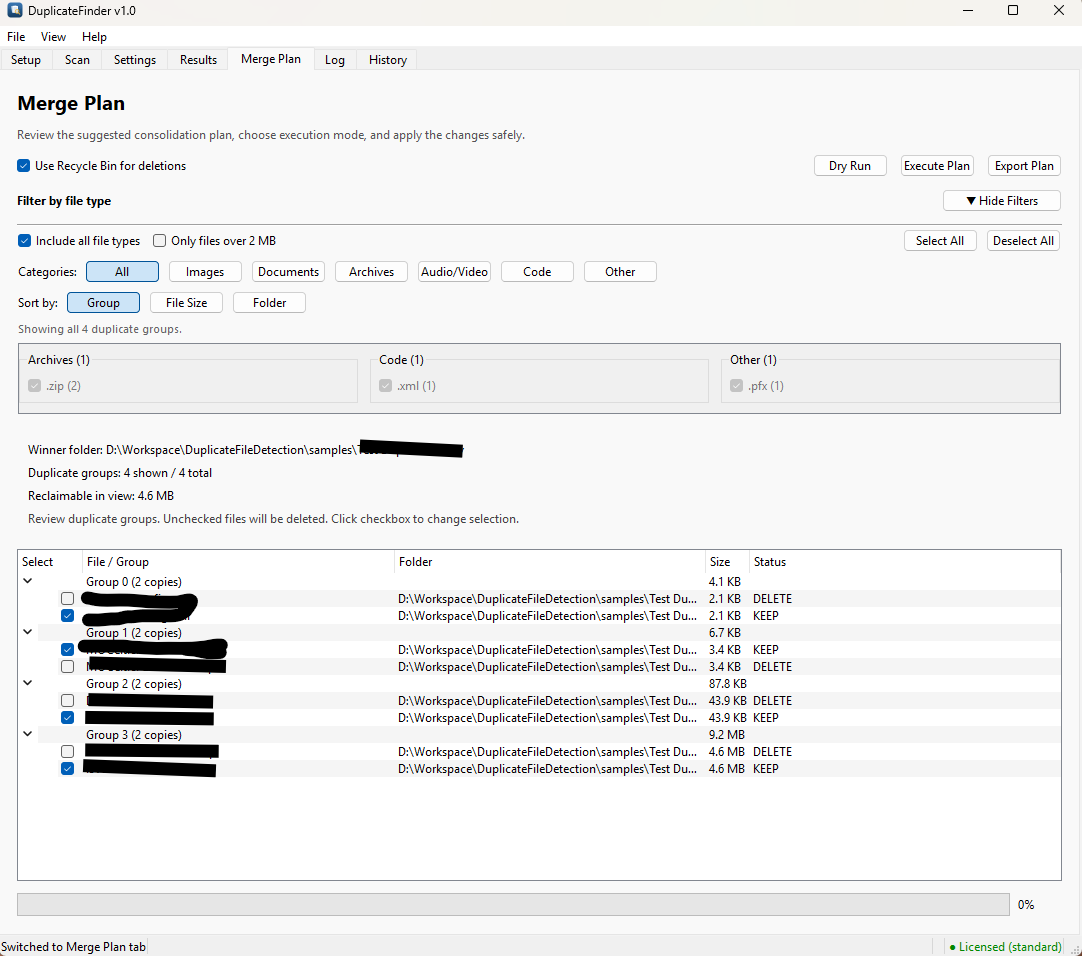
How the winner is chosen
For each duplicate group, DuplicateFinder selects the winner folder — the folder that already contains the greatest number of files. Files in the winner folder are marked KEEP; all other copies are marked DELETE. The winner folder is shown above the file list. You can override the selection by unchecking/checking individual rows.
Filtering the plan
Use the Filter by file type controls to narrow the list before executing:
- Click a category button (Images, Documents, Archives, Audio/Video, Code, Other) to show only that category's groups.
- Enable Only files over 2 MB to focus on large-file savings first.
- Use Sort by to order groups by Group, File Size, or Folder.
- Select All / Deselect All toggles all rows in the current view.
- The type breakdown panel shows a count of groups per extension so you can see at a glance what kind of files make up the plan.
Reviewing rows
- Each row shows: file name, folder path, size, and status (KEEP or DELETE).
- Un-check the checkbox next to any file to exclude it from the run; it will not be deleted.
- The summary above the table shows total groups in view, reclaimable space, and a reminder that unchecked files will be deleted.
Dry run
Click Dry Run to simulate the entire plan without moving or deleting anything. A detailed report shows exactly what would happen. This is strongly recommended the first time you use DuplicateFinder on an important folder.
Executing the merge
Click Execute Plan to start. The progress bar at the bottom tracks each file operation. Duplicates are sent to the Recycle Bin (if the setting is enabled), so you can undo the entire operation from Windows Recycle Bin if anything looks wrong.
Click Export Plan to save the planned operations to a file for review or record-keeping before executing.
Log Viewer
Real-time diagnostic output.
The Log tab streams all application events in real-time. Each entry shows a timestamp, severity level, and message. A live log of scan-phase events also appears directly in the Scan tab below the summary panel.
Log levels
- INFO — normal operation events (scan started, files indexed, merge complete).
- WARNING — non-fatal issues (permission denied on a folder, a file changed during scan).
- ERROR — failures that may affect results (hash error, failed move operation).
- DEBUG — verbose per-file detail (enable in Settings when diagnosing a problem).
Log files on disk
Logs are written to rotating files at:
%APPDATA%\DuplicateFinder\logs\
Up to 10 daily log files are kept (oldest deleted automatically). If you need to send logs to support, zip this folder and attach it to your email.
Scan History
Browse and reload previous results.
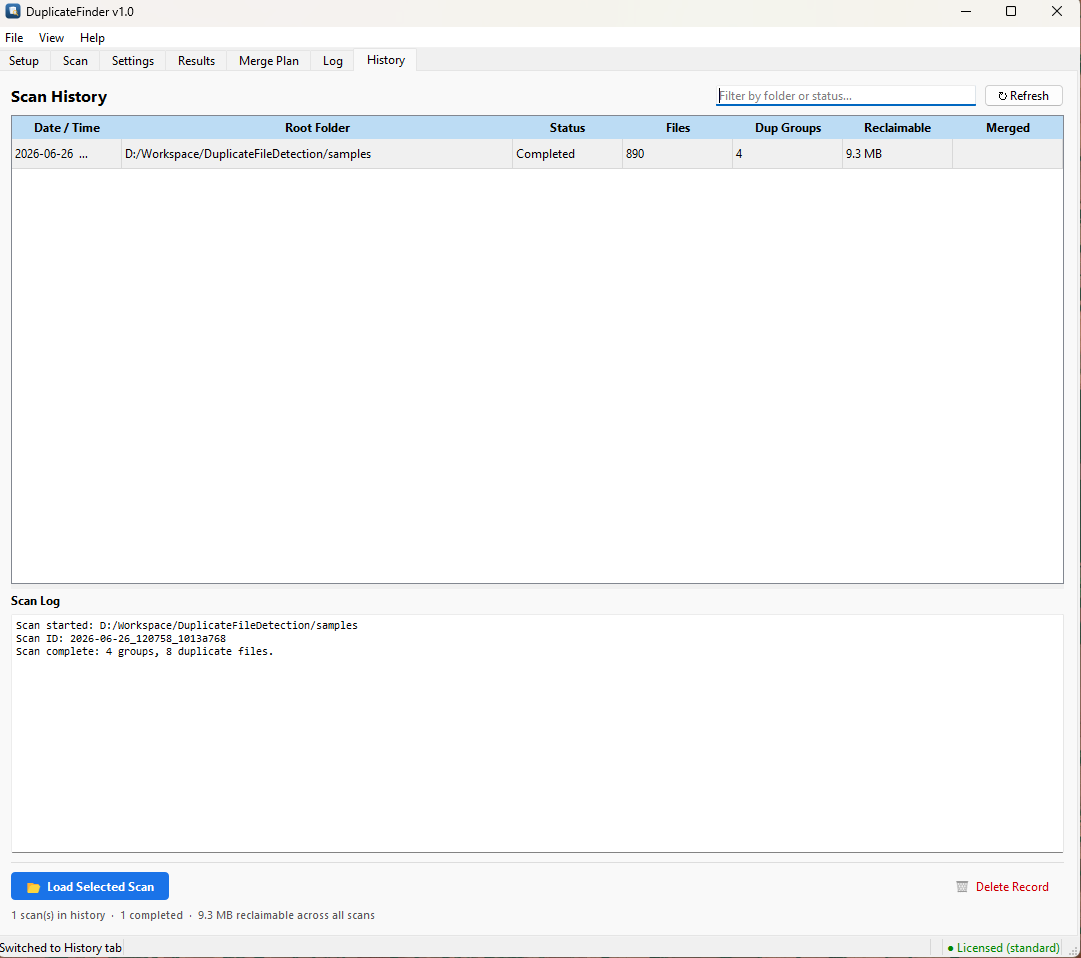
DuplicateFinder automatically saves a record of every completed scan. The History tab lists them with the following columns:
| Column | Description |
|---|---|
| Date / Time | When the scan started. |
| Root Folder | The folder that was scanned. |
| Status | Completed, Cancelled, or In Progress. |
| Files | Total files indexed during the scan. |
| Dup Groups | Number of duplicate groups found. |
| Reclaimable | Total space that could be freed by merging all groups. |
| Merged | Whether a merge plan was executed for this scan. |
Scan Log panel
Selecting a history entry shows its Scan Log below the table — a brief summary including the scan ID, start time, root folder, and outcome (e.g. "Scan complete: 4 groups, 8 duplicate files.").
Loading a previous scan
Select a history entry and click Load Selected Scan to restore that scan's full results into the Results and Merge Plan tabs. This lets you return to a previous scan and generate or re-execute a merge plan without re-scanning.
Managing records
- Use the Filter bar to search by folder path or status.
- Click Refresh to reload the list if a scan just completed in the background.
- Select a record and click Delete Record to remove it from history. This does not affect any files on disk.
The footer shows a summary across all records: total scans, completed count, and total reclaimable space.
Support
If you encounter a bug or need help with activation, email support@azideasolutions.com. Include:
- DuplicateFinder version (shown in Help → About).
- Windows version and build number (
winver). - A brief description of what you expected and what happened.
- The log files from
%APPDATA%\DuplicateFinder\logs\(if relevant).